Designing anniversary and My Little Pony cakes

Here are the cakes I recently designed and created. My sister baked the cake for the 50th Anniversary ones, and with the leftover we made the my little point cake for my niece's birthday - and I did the frosting, filling and decorating. My advice for designing cake is be sure you can visualize it first. If it's a big job, sketch it all out first. I won't go into the details, but I'm posting some of my favorite recipes this summer for cakes. I'll also post my favorite summer dessert recipes. I'm basically just making a list of favs... before I forget them. :P

Enjoy!

Super Easy Vanilla Buttercream (used in both cakes)

Soften 4 sticks butter in microwave until soft (maybe 10 - 20 seconds) but not melted at all. Put in mixer at medium speed until creamed (about a minute). Change to low speed and  7 cups powdered sugar on at a time until incorporated. Add 2 tablespoons vanilla, 1/4 salt and 4 tablespoons milk. Mix on medium-high for three minutes. Voila!

Super Easy Chocolate Mousse

  1. 1/3 cup hot water
  2. 1 cups semi-sweet chocolate chips
  3. 1.5 cups heavy cream
  4. 2 Tbsp sugar

Add Hot water to chocolate chips and melt in microwave for 30 seconds (stir) and then another thirty seconds. Repeat until chocolate is almost melted (don't over heat or won't work). Meanwhile Whip the cream and add sugar. Fold in chocolate. Chill. 

Vanilla Lemon Macarons

Filling:

In mixing bowl crewm 1/4 softened butter  + 1/4 cup cream cheese. Then add lemon juice to taste (maybe 1 tbs) + add powdered sugar until consistency of frosting.

Cookies:

- 2 egg whites

- 1/4 teaspoon vinilla

- 1/4 teaspoon cream of tartar

- 1/8 teaspoon salt

- 1/2 cup sugar

- 1 tablespoon cornstarch

(This below recipe is copied from: http://www.recipe.com/lemon-meringue-sandwich-cookies/ )

  • In a medium bowl allow egg whites to stand at room temperature for 30 minutes. Preheat oven to 300 degrees F. Line two large cookie sheets with parchment paper; set aside.

    2.  

    Add vanilla, cream of tartar, and salt to egg whites. Beat with an electric mixer on medium to high speed until soft peaks form (tips curl). In a small bowl combine sugar and cornstarch. Gradually add the sugar mixture to the egg white mixture, about 1 tablespoon at a time, beating on high speed until stiff peaks form (tips stand straight). Fold in lemon peel.

  • 3.  

    Transfer egg white mixture to a disposable piping bag fitted with a large round tip. Pipe 1- 1/2-inch circles that are between 1/4 and 1/2 inch thick onto the prepared cookie sheets, leaving 1 inch between circles.

    4.  

    Place cookie sheets on separate oven racks; bake for 10 minutes. Turn off oven; let cookies dry in oven with door closed for 1 hour. Carefully lift cookies off parchment paper. Transfer to wire racks; let stand just until cookies are cool. (The cookies can quickly become tacky, especially if the weather is humid. To prevent this, store unfilled cookies in an airtight container at room temperature for up to 3 days.)

    5.  

    Just before serving, placeLemon Filling in a piping bag fitted with a large round tip or in a resealable plastic bag with a corner snipped off. Pipe 1 teaspoon filling onto the flat side of half the cooled cookies. Top with remaining cookies, flat sides down, to make sandwich cookies. Makes about 34 sandwich cookies (2 sandwich cookies each).

Summer Rum and Berry Trifle

Stack Vegan Vanilla Cake (see recipe below) with whip cream, fresh berries and spiced rum.

Extra info : The vegan cake is denser so it soaks up the rum without getting mushy - I discovered this when I didn't have eggs one day... I actually used regular milk... and cream on top so this is not vegan!! And I also had loads of spiced rum due to Christmas cocktail  party leftovers... This turned out so good though I've already made it again!

Cake modified from http://lovingitvegan.com/vegan-vanilla-cake/

INGREDIENTS

  • 1 and ¾ cups (220g) All-Purpose Flour
  • 1 cup (200g) Sugar
  • 1 tsp Baking Soda
  • ½ tsp Salt
  • 1 cup (240ml) Milk (or non dairy if ya wanna go vegan!)
  • 2 tsp (10ml) Vanilla Extract
  • ⅓ cup (80ml) Olive Oil
  • 1 Tbsp (15ml) White Vinegar
  1. Preheat the oven to 350 degrees Fahrenheit (180 degrees celsius)
  2. Sift the flour into a mixing bowl.
  3. Add the sugar, baking soda and salt and mix together.
  4. Add the soy milk, vanilla, olive oil and vinegar and whisk it in.
  5. Grease two 7 inch round cake tins with coconut oil and divide the mixture evenly between them.
  6. Bake for 30 minutes.
  7. Remove from the oven and using a toothpick, insert into the center of the cake. If it comes out clean then your cake is done.
  8. Move to a cooling rack to cool completely.

Chocolate Lace Wrapped Pumpkin Cheese Cake and Pumpkin Shaped Bundt Cake

Chocolate Lace Pumpkin Cheesecake

A year or so ago I did a blog displaying aChocolate Lace Wrap I made using Julia Ushers tutorial - it was super minimal, and I realized people were searching for a template. So - as your thanksgiving present - I provided free for you a template to create your own pumpkin cheesecake chocolate lace wrapped thanksgiving indulgence of love. Your welcome.

What you need:

- Lace Pattern (Do not fit to page when printing)

- A nine inch pumpkin cheesecake (I created this one because of the nice flat top.)

- Godiva Chocolate melts or Chocolate chips

- Parchment Paper

- A long Board

- Gallon size plastic baggies

- Scissors

1. Cut out patter and tape together. Tape together to form a long strip, anddown to a long board (cardboard will work, I used a mini ironing board.) Place parchment paper on top - but have the bottom edge of parchment paper line just below the bottom edge of the pattern.

2. Melt chocolate in microwave according to directions (30 seconds, stir, repeat until you can stir the lumps out. Usually takes less then a minute and half). Spoon into plastic bag. Snip of a TINY bit of the edge so you can pipe a thin line out. Trace the pattern.

3. When finished, as soon as none of the chocolate is runny (but NOT hard!) wrap around the cake. Very carefully press it against the cake and the end edges together. You might have to use a little melted chocolate as glue to make those edges touch and stick.

5. Refrigerate until chocolate is hard. CAREFULLY move to table. The lace is very fragile! But once everyone sees your beautiful dessert - cut it open and enjoy!

Pumpkin Shaped Cake made with Bundt Cakes with homemade pulled sugar stem

What you need:

- Two bundt cakes, cooled

- Two cans of orange frosting

- Luster dust (makes it shiny/can get at hobby lobby, online, cake shop...) and sprinkles

- Red/Yellow Food coloring if you want to shade some of the frosting

-2cup sugar

- 2/3 Cup corn syrup (I use light corn syrup as it won't mess up the color)

- 4 tablespoons H20

- Few drops of food coloring (red in this case) and flavoring if you want it (cherry in this case)

- Thick Gloves (or several layers of thin ones

- Silpat or Parchment paper

Place both bundt cakes upside down. Using a bread knife, level the flat edges and save the extra cake. Frost the top of one bundt cake (usually the bottom) and place the other one on top to create a pumpkin shape. Use the excess cake from leveling to fill the center. Frost the cake. Create thick lines of frosting down the edges as in picture to create a pumpkin look. Add a bit of red to some of the frosting to add shading or different oranges colors to create a more organic look.

PULLED SUGAR CAN BE VERY HOT AND DANGEROUS - FIRST WATCH THIS VIDEO TO GET AN IDEA OF IT AND BE CAREFUL! Put sugar, corn syrup, water in pot and boil for ten minutes brushing edges with water until its starts turning gold. Poor CAREFULLY on silpat/parchment paper - allow to cool a bit. WEARING GLOVES, start pulling up edges. Add a bit of die Fold on itself, and gradually, once cool enough to pull up without sticking to your gloves, pull it up, fold on itself, pull and repeat until shiny. Once its cooled to the point where you can form it (within about a minute) twist a large chunk into a 5 inch stem shape. Twist smaller parts into vines. Cool completely.

Press stem into center of cake (like a candle). Add whatever vine like pieces around. Finish off with luster dust.

Hope you enjoyed this blog -- Enjoy!


Christmas Party Ideas and Frozen Gingerbread Castle

Christmas parties are way too fun. Why? It's the time of year to give yourself a free pass and drink all the eggnog your stomach can handle (I have yet to discover my threshold). It's also a great excuse to cook from the Betty Crocker Christmas cookbook (cans of cheese soup as a main ingredient wouldn't fly come January). I am going to go ahead and say it: Betty Crocker Christmas cookbook is amazing. We use it every year, and it has the best, simplest, stress-free super tasty recipes. ( sorry fans - no quinoa or kale). Great gift idea - although maybe your mother has one that you can eternally borrow, like we did.. ;)

Betty Crocker Cheese Balls

Betty Crocker Cheese Balls

I have found to set a very beautiful food table, its a good idea to have different heights for serving plates - it adds a lot of dimension and makes a table look awesome.

For a fairly cheap decoration, put leftover tree branches with a few red roses in a jar. You can take off the top metal hanger-part of a round ornament, leaving a hole, and stick it upside down on a bamboo skewer to add another element to this Christmas bouquet. You can also glue a bamboo skewer to a pinecone.

Simple rose and tree branch bouquet

Simple rose and tree branch bouquet

As for drinks, here are the best ones we had:

Gingerbread Martini:  Mix with shaker/ice: 1 oz vodka,  1/2 oz Kahlua, 1 oz Gingerbread syrup*, 1 oz half n' half. Top with whip cream and gingerbread cookie.

* You can get Gingerbread syrup for 12.95 at Starbucks - they sell it behind the counter so you have to ask and in my case the employee wasn't too sure, so you might have to ask a manager.

Peppermint Hot Chocolate:  This you can leave on the stove top while people help themselves. Use Hersheys Cocoa (4 cups milk + 8 tbs cocoa + 4-8 tbs sugar) and add Peppermint Schnapps to taste. Top with whip cream, red sprinkles and a mini candy cane to get yourself ready to "Baby It's Cold Outside" karaoke.

How to Design an AWESOME dragon cake for kids

I'm going to keep this simple. If you want to make an awesome cake for kids - make it out of Rice crispy treats. You can form it (while still hot) in to any shape. I made my little brother an upright lego man! For this dragon cake - I stacked frozen cake around a gas station plastic cup and then formed the dragon out of rice crispy. For scales I cut fruit rollup into triangles & glued everything on with frosting. For the castle walls. I made chocolate cookies and cut holes and placed hard candy in the hole to make 'stained glass'.   I used a formula scoop for a cookie cutter (protien scoop for those of you in a different lifestyle? :)). I also threw in a couple glowsticks in the 'cave'.My neice loved this cake so much - only problem is it's super time-consuming & now my nephew wants one too.. 

Under all the frosting... 

Under all the frosting... 

Chocolate Lace Cake Wraps

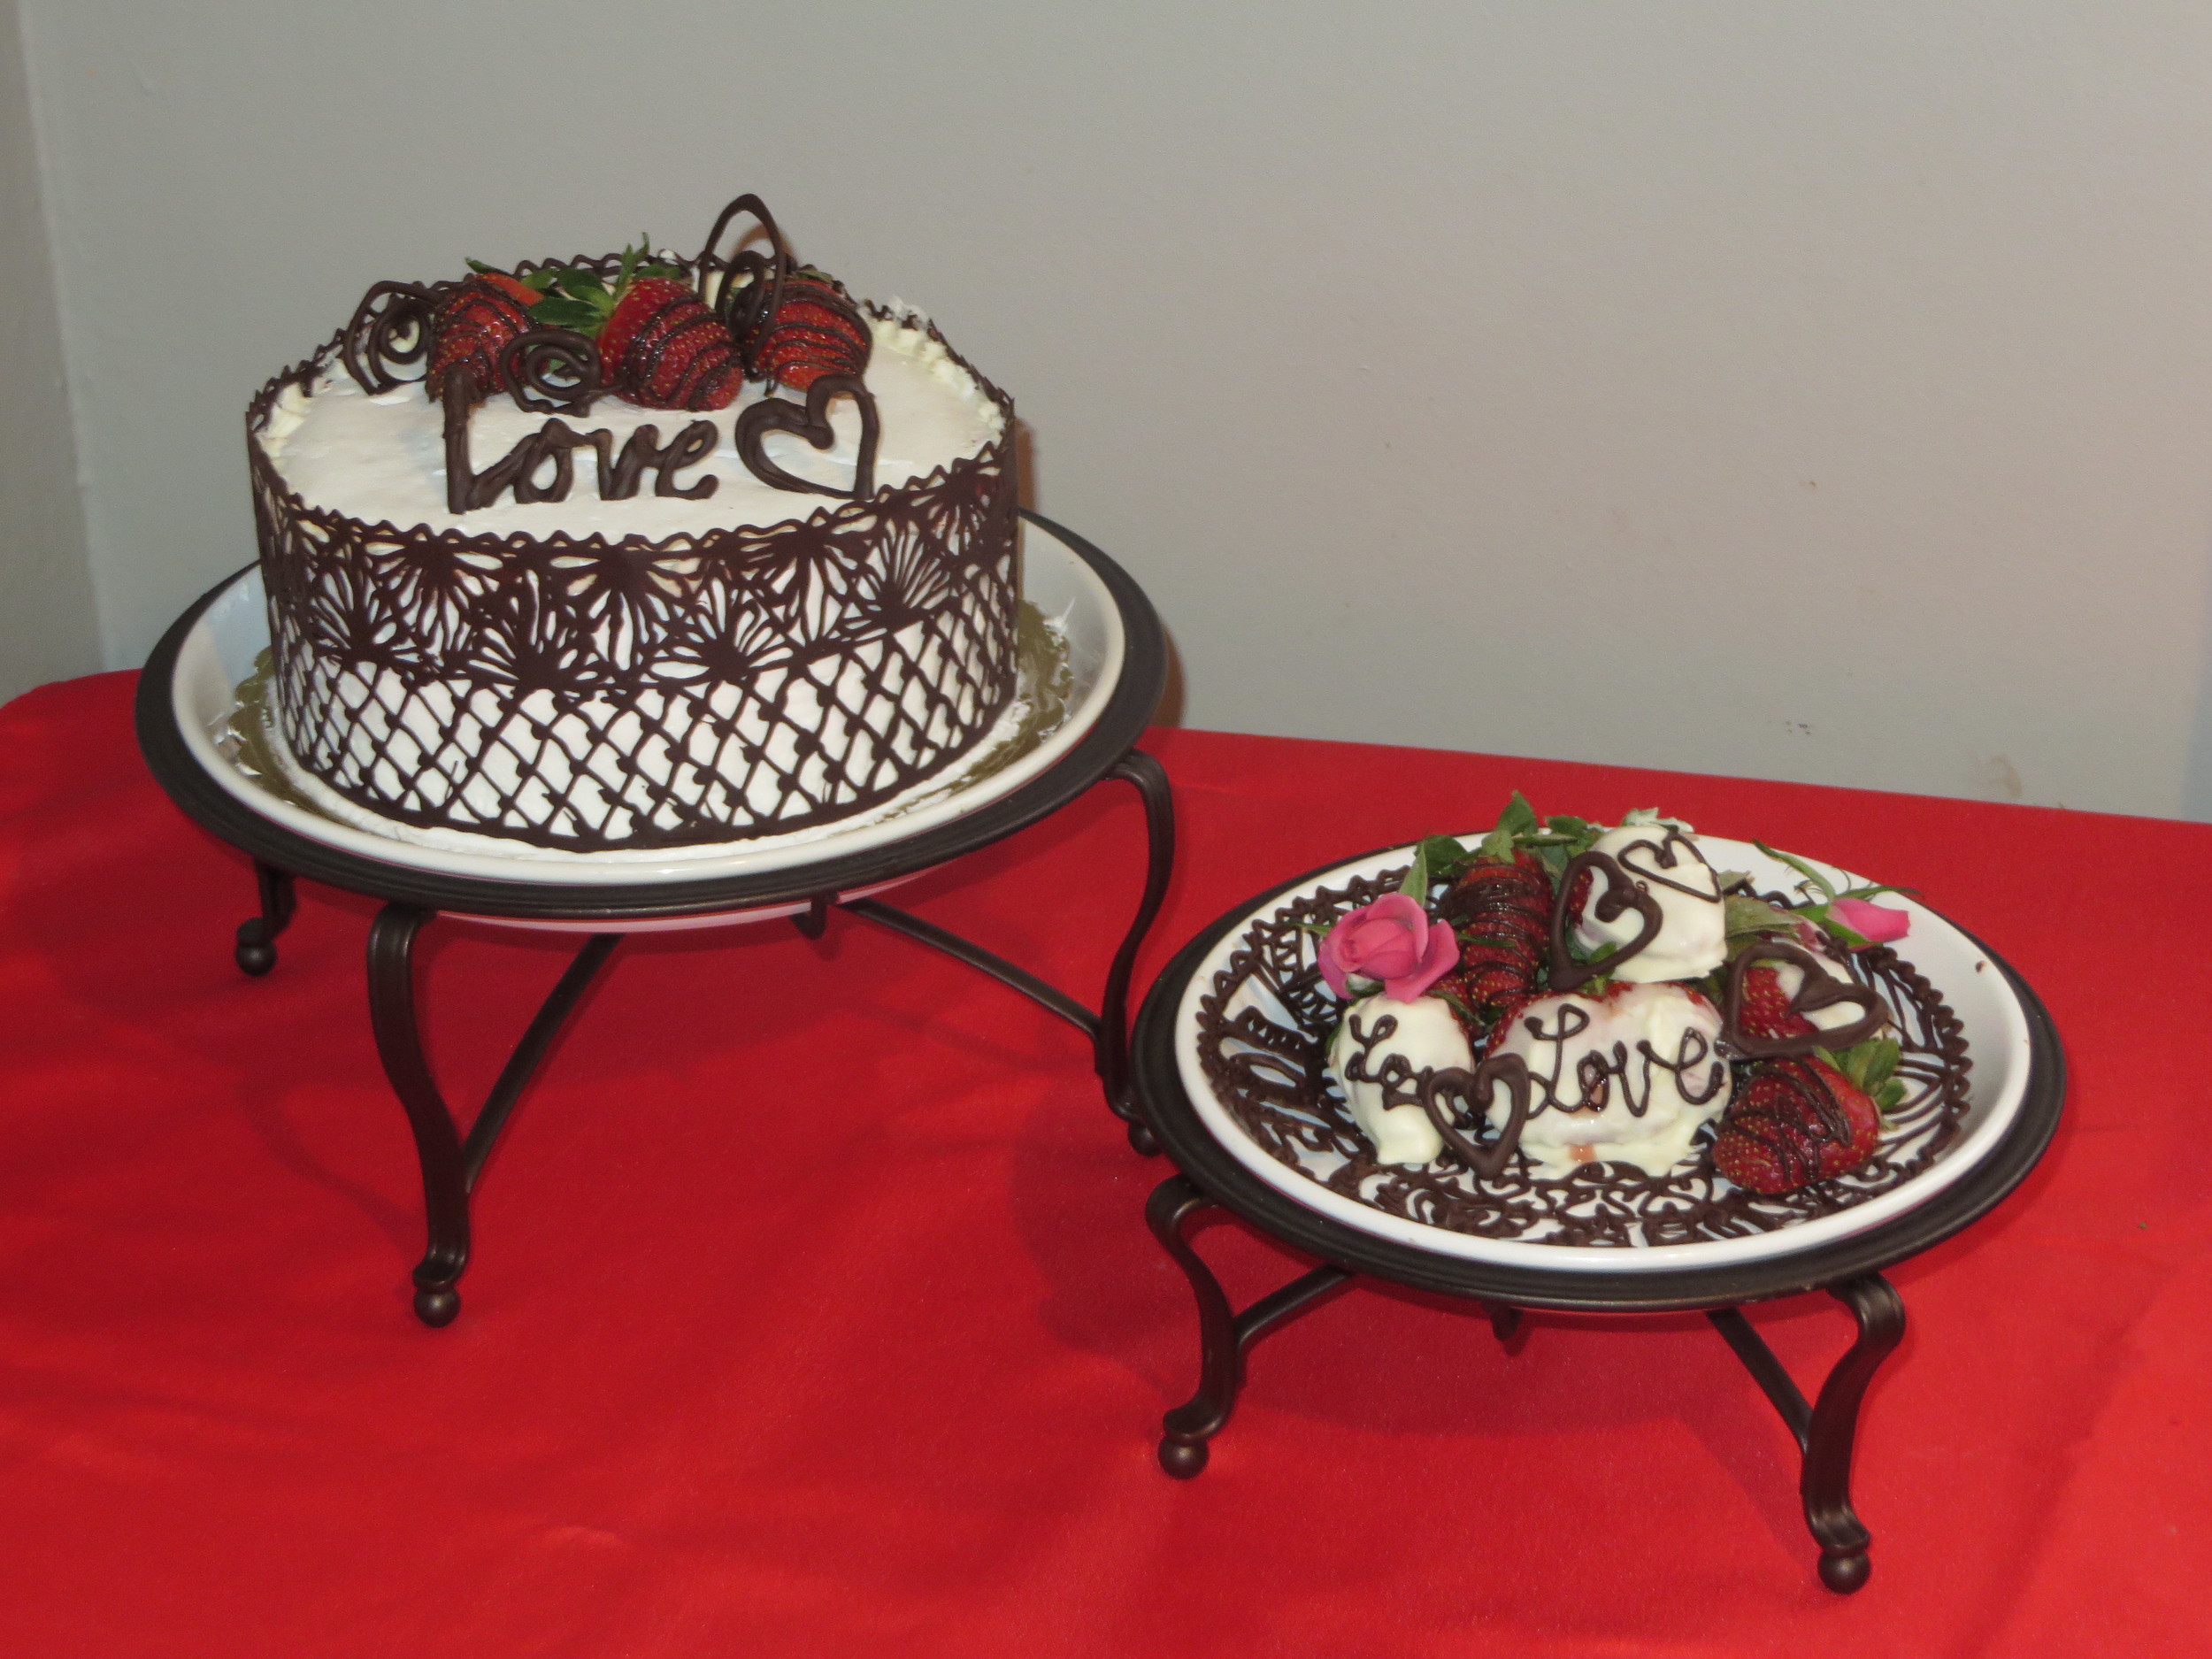
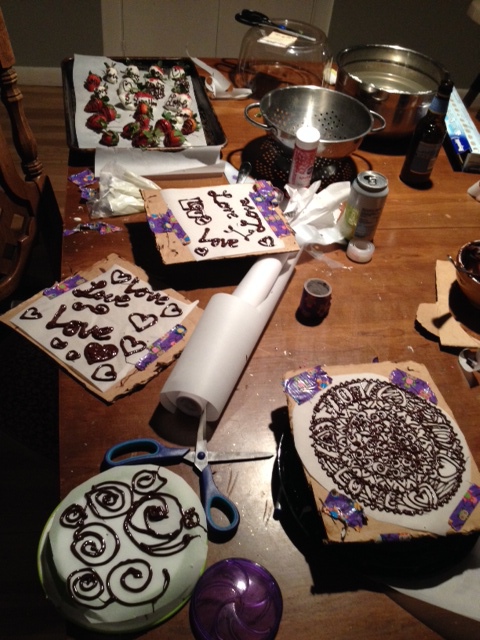
I wanted to try this Julia Usher Cake Lace out for a test run for my sister's baby shower.  I am no cake decorator, but I found this this was surprisingly easy if you have patience and fairly good handwriting.. I just microwaved chocolate chips in the microwave, scooped it in decorating bags and snipped the tip of the bag (no need for fancy tips which is nice...) This was for a valentines day lunch so I added chocolate covered strawberries.  I was up until 11 doing this - it was so fun! As you can see my table was a disaster, and I just taped parchment on whatever to use up all the chocolate... :) It's way easier than it looks. You can also make doilies ahead of time and stack them in the fridge to make an awesome placement for a special dessert for a special someone... Although this, by the way, was not for my husband. He's getting mail-ordered steak :) 

See video 

Pumpkin Ribbon Bread! & fall-week meal plan..

Okay, so it has been pointed out that my 'blog' aint really a blog, but just a display of random projects - so here I go! I am going to write a bit more (or shall we say bore more?) :). 

One of my greatest challenges as a wife & mom is the whole cooking thing. (wha?!) Yep, not exactly my favorite thing to do - spend two hours cooking to gobble something up in less then 2 minutes... Ever since I decided to start chewing my food (epiphany in my twenties coming from a family with eight kids), I actually 'enjoy' food, and fill up before I get sick. This 'enjoying of food' and the fact that my husband loves a warm cooked meal (a man thing?) - I started putting more thought into creating a healthy meal plan. Here is this week's fall plan - most recipes from Skinny Taste Blog:

Butternut Squash Lasagna Rolls | Loaded Sweet Potatoes | Parmesan Chicken Nuggets & Garlic Mashed Cauliflower | Parmesan Chicken Salad w/ Craisens | Salmon & Acorn Squash | Thawed out Butternut Squash Lasagna Rolls

Ha - there's my lazyness - last two days of the week are fish (freezer to oven BAM! done!) and whatever I made in the beginning of the week (freezer to microwave BAM! done!)

Okay, lets cut the [healthy] crap. The real reason for this post is to share my favorite fall indulgence, a recipe given to us for our wedding by a friend of my husbands family: Pumpkin Ribbon Bread

Cream Cheese Filling: 6 oz cream cheese, 1/4 cup sugar, 1 tb. flour, 2 egg whites. For filling combine in bowl - set aside.

Bread: 1 cup pumpkin, 1/2 cup apple sauce, 2 eggs whites, 1 tb. canola oil, 1 2/3 cup flour, 1 1/4/ cup sugar, 1 tea. baking soda, 1/2 tea. salt, 1/2 tea. ground cinnamon, 1/2 tea. ground cloves. In a bowl beat pumpkin, egg, egg whites, applesauce & oil. Combine the flour, sugar, baking soda, salt, cinnamon, clove; add to pumpkin mixture.  Divide 1/2 batter in 2 8" x 4 " load pans coated with cooking spray. Spread each with filling then top with remaining batter.

Bake 350 degrees F for 40 - 50 minutes Cool 10 minutes before removing from pans to wire rack.  

pumpkin bread.jpg

Cake Bouquet: W.F.B Creative Outlet #3

Waiting For Baby Creative Outlet #3.

I have been wanting to make one of these delicious cupcake bouquets and there are tons of tutorials online - so look 'em up if you're interested. :) My only advice? Don't try to transport the thing.

sprinkles = birthday!

sprinkles = birthday!

I didn't have a fancy Styrofoam ball, so I just glued a bunch of Styrofoam bowls together. It kinda worked...  

I didn't have a fancy Styrofoam ball, so I just glued a bunch of Styrofoam bowls together. It kinda worked...